From Tools to Trust — Building Operational Context in Your RunWhen Workspace
This guide walks through building operational context in RunWhen: the process of adding Rules, Commands, and Knowledge to your workspace so AI Assistants move from generic answers to investigations your team has confidence in.
The outcome is operational confidence — the point where your team trusts assistant output enough to act on it without second-guessing, escalate based on it without verifying, and hand it to a new engineer without caveats.

Note The screenshots and examples in this guide are from the Sandbox workspace to keep the walkthrough concrete. The same workflow applies to any workspace.
This guide focuses on UI usage. To manage the same context as code — versioned in your own repo and applied from CI — see Managing Context as Code (GitOps), backed by the RunWhen API and the runwhen-platform-mcp server.
Operational context maturity model
A new workspace starts at Level 1: Foundation — tasks and automation are running against live infrastructure, and AI Assistants already have rich diagnostic output to work with. Unlike tools that rely solely on metrics, events, logs, and traces (MELT data), RunWhen’s foundation is built on the output of active scripts and tasks that interrogate your systems directly. The assistants can already identify issues, run diagnostics, and surface findings.
What the assistants lack at Level 1 is your team’s context. Every finding gets equal weight because the assistants don’t know which findings your team considers expected noise and which ones demand immediate attention. The assistant can tell you what is happening, but not what matters. Most AI-driven operations tools never get past this point. Building operational context is how you do.
Teams typically progress through four levels:
| Level | What you add | Outcome |
|---|---|---|
| 1 — Foundation | Tasks running against live infrastructure, assistants operational with diagnostic output | Thorough investigations driven by active task output — but without team-specific interpretation |
| 2 — Signal | Rules for noise suppression and priority framing | Focused investigations — known noise acknowledged, real issues surfaced first |
| 3 — Standardization | Commands for repeatable procedures, Knowledge for institutional context — both can reference Tasks or point to external systems for dynamic context | Consistent investigations — any engineer gets the same quality, onboarding accelerates |
| 4 — Integration | Rules, Knowledge, and Commands connected to external systems (CI/CD, incident management, change workflows) | Adaptive operations — context updates automatically with your release and incident lifecycle |
Most teams reach Level 3 within the first 30 days. The knowledge already exists on your team — the effort is making it explicit, not generating it from scratch. No dedicated headcount, no separate initiative.
| When | What | Who | Time |
|---|---|---|---|
| Day 1 | Write 2–3 Rules to suppress known noise, re-run a baseline prompt | 1 engineer | ~30 min |
| Week 1–2 | Add 1–2 Commands for your most common investigation patterns | 1 engineer | ~1 hr |
| Week 2–3 | Add 3–5 Knowledge entries for ownership, architecture, release process | 1–2 engineers | ~1–2 hrs |
| Week 4 | Review assistant feedback, adjust Rules, capture new Knowledge via /remember | 1 engineer | ~30 min |
| Ongoing | Capture context as it surfaces during normal investigations | Anyone on the team | Minutes per entry |
Each addition compounds — a Rule written on day 1 improves every investigation that follows, for every engineer and every assistant in the workspace. This guide covers Levels 1 through 3 in detail, with notes on reaching Level 4.
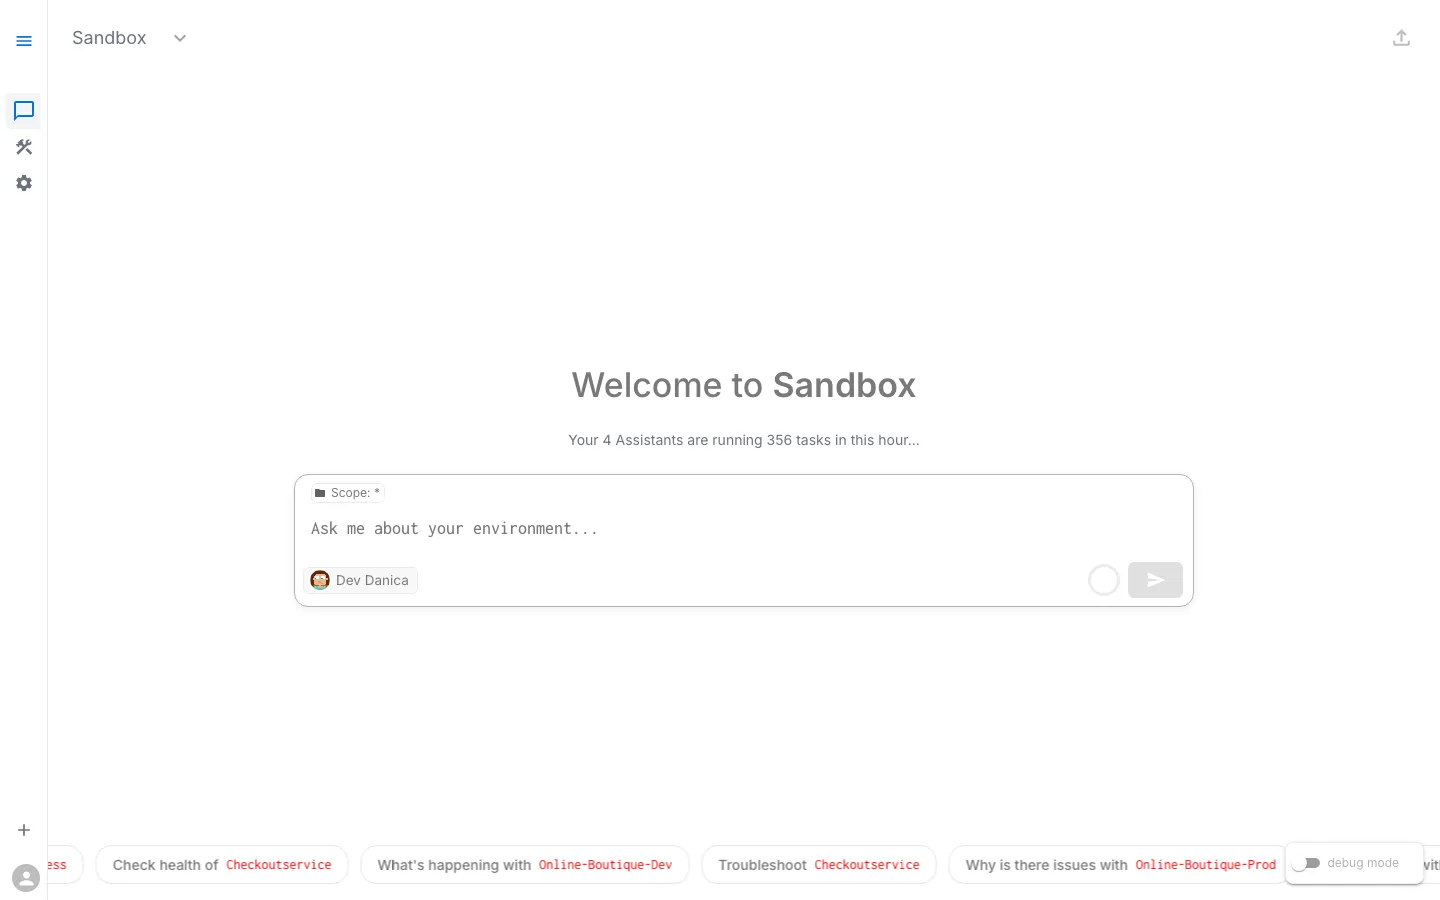
Step 1: Capture a baseline in Workspace Chat
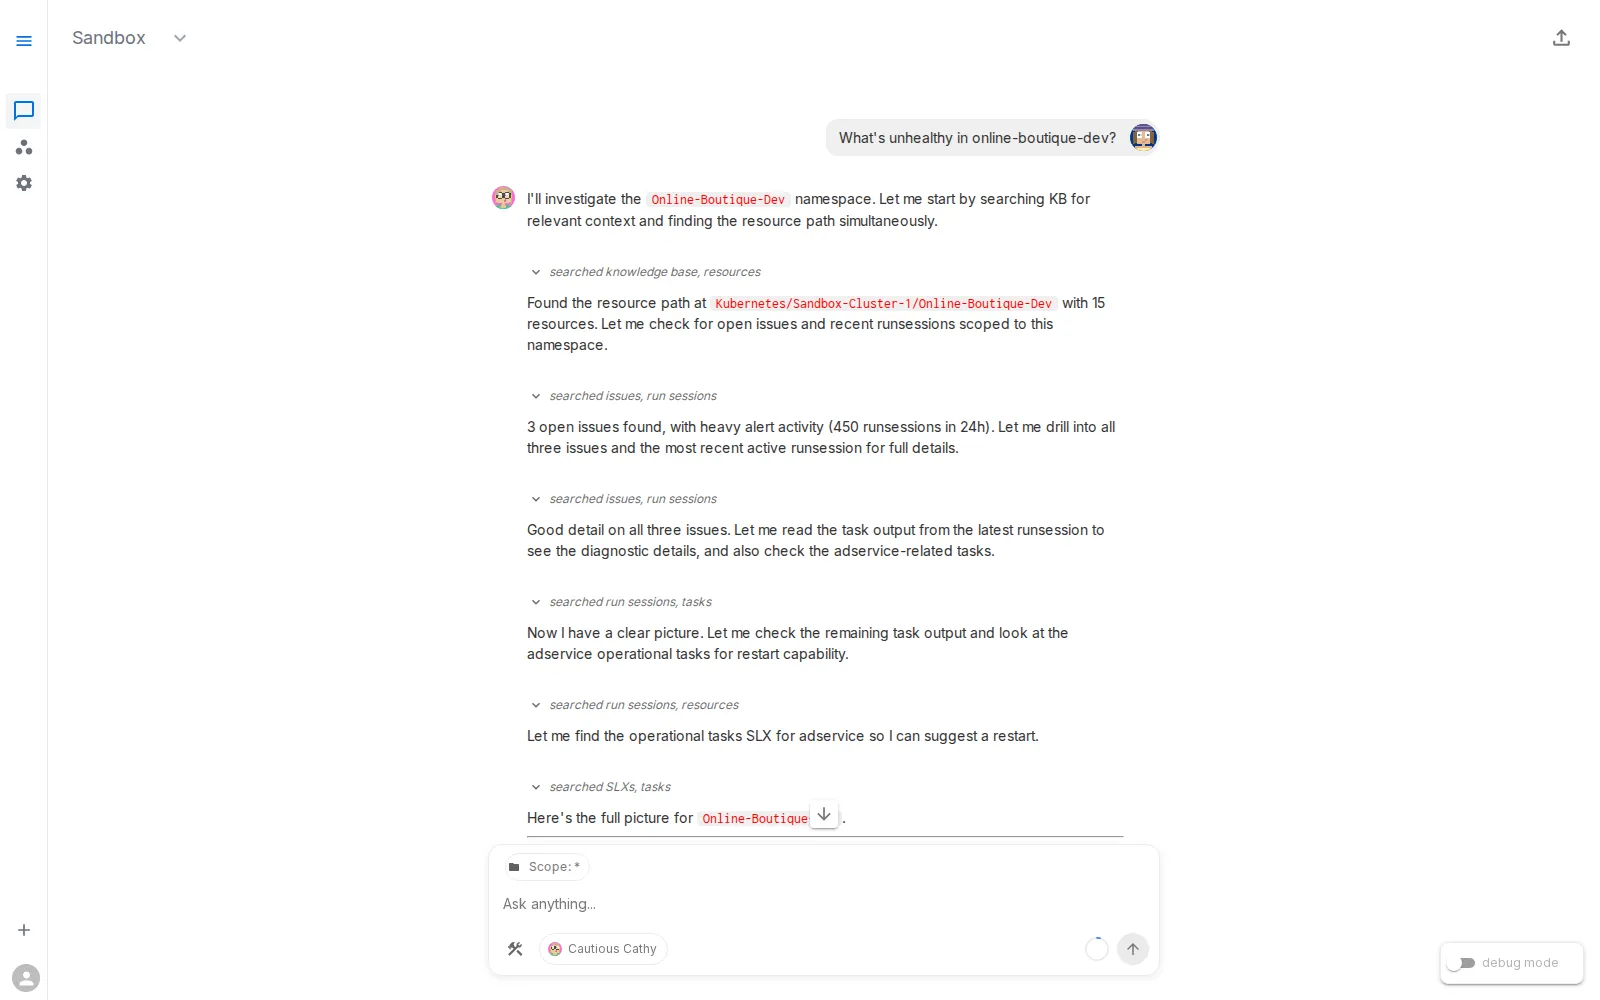
Open your workspace at app.beta.runwhen.com, navigate to Workspace Chat, and run a prompt your team asks often:
What's unhealthy in online-boutique-dev?
Before adding any context, note the current quality:
- Is the answer focused on likely root cause?
- Are expected lab/platform events over-emphasized?
- Are next steps specific and actionable?
This is your Level 1 baseline. You will re-run the same prompt after each addition to measure progress.
Step 2: Add Rules — move to Level 2 (Signal)
Effort: 1 person, ~30 minutes. This is the single highest-impact step — most teams see immediate improvement in investigation quality.
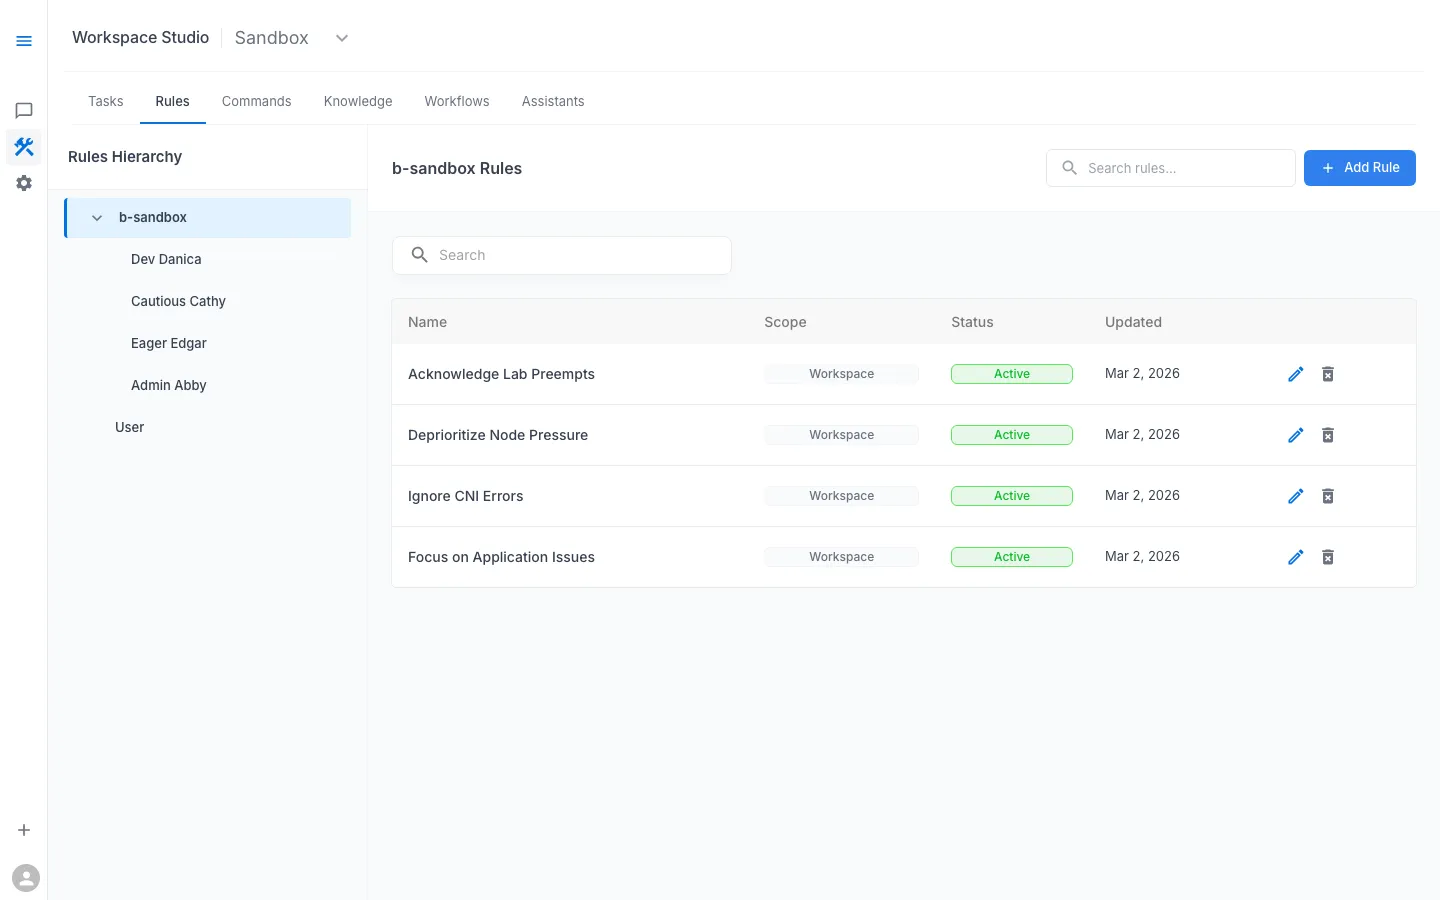
In Workspace Studio → Rules, add guidance that changes how findings are interpreted. The engineer who best knows your environment’s expected noise is the right author.
What Rules do
Rules are loaded directly into the assistant’s prompt context every time it responds. They shape interpretation:
- what to de-prioritize
- what to highlight
- how to explain expected behavior versus actionable risk
Rules can be scoped at the workspace level (all assistants) or the assistant level (a specific persona). Both levels are always loaded — they are not optional context the assistant might consult.
When to add Rules
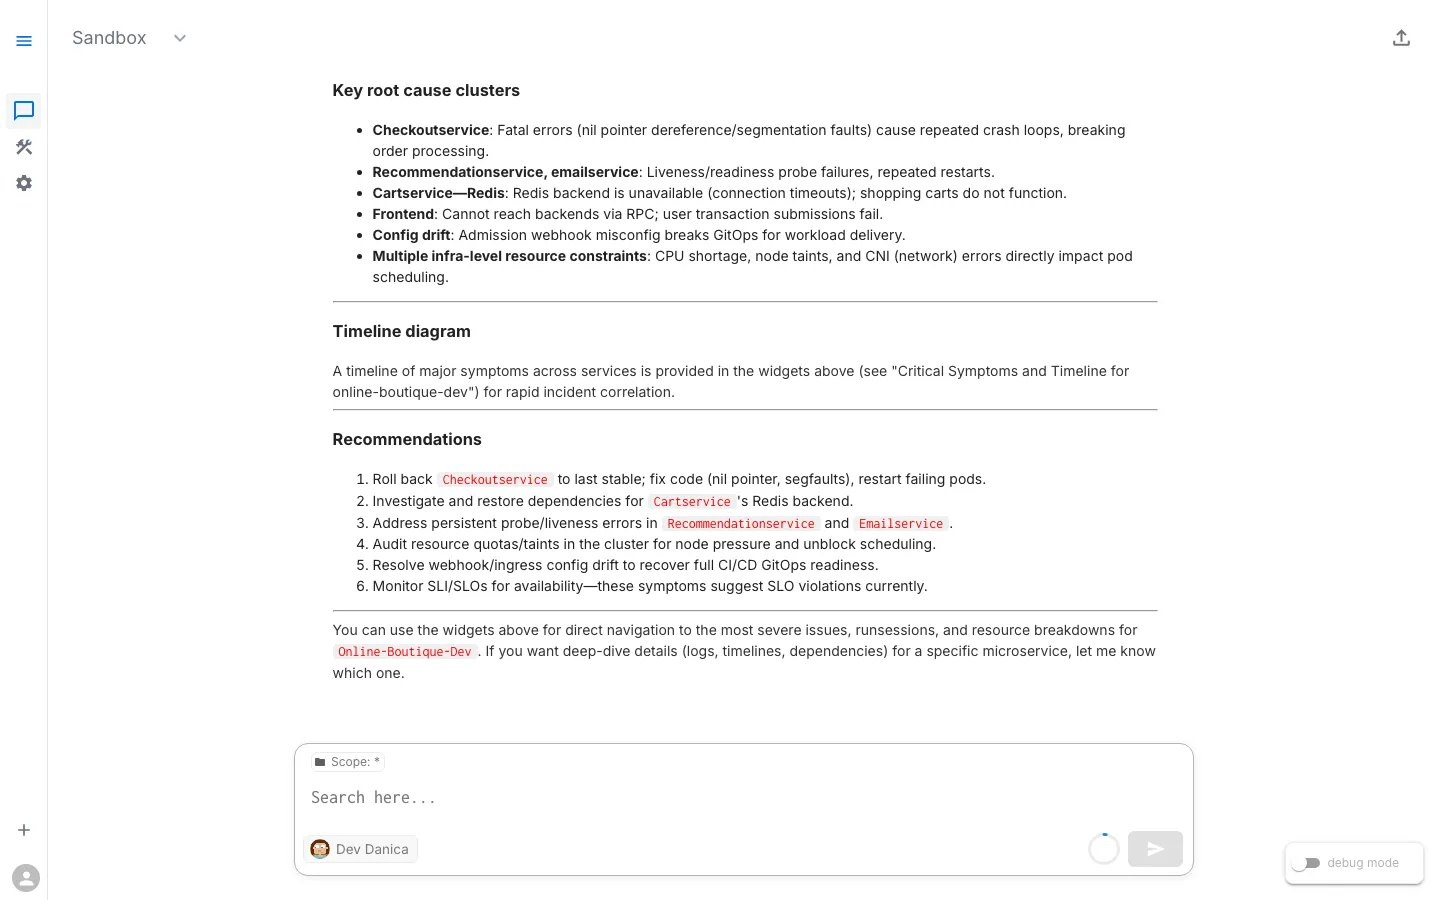
Add Rules when responses are technically correct but operationally noisy — repeated focus on expected infrastructure churn, important application issues buried in long summaries, or inconsistent severity language across investigations.
Example Rules for shared lab/dev environments
- Acknowledge Lab Preempts: preemptions are expected unless clearly correlated with user symptoms.
- Deprioritize Node Pressure: mention pressure briefly, prioritize app-level impact first.
- Ignore CNI Errors unless correlated: do not treat intermittent CNI noise as root cause by default.
- Focus on Application Issues: prioritize crash loops, error logs, config mismatch, and failed dependencies.
Rule-writing tips
- Write short, explicit instructions with clear priority direction.
- Use “unless correlated with symptom” language to avoid hard blind spots.
- Start with 2–3 rules and iterate using real sessions.
- Keep rules concise (1–3 sentences). If it needs a paragraph, it likely belongs in Knowledge instead.
- Review rules quarterly — a rule about a known flaky service is wasted context once that service is stabilized.
Step 3: Add Commands — move to Level 3 (Standardization)
Effort: 1 person, ~1 hour. The person who already runs these investigations manually is the right author — they are codifying what they already do.
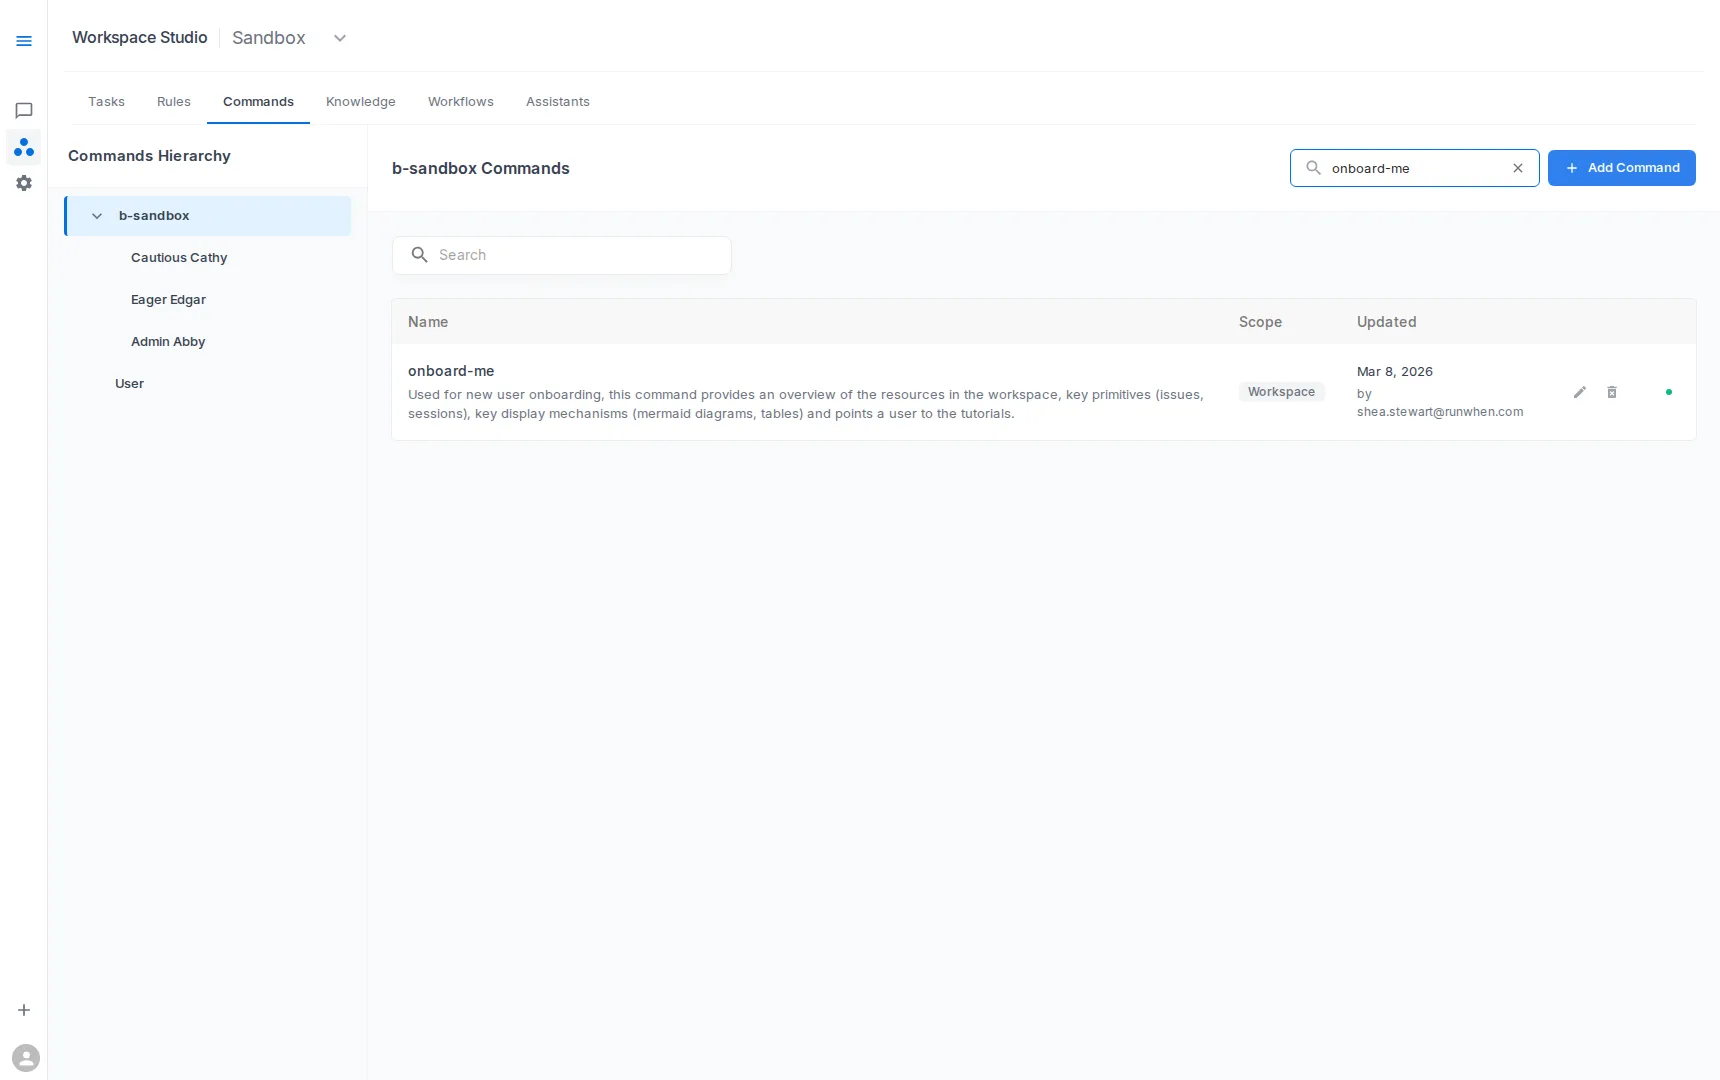
In Workspace Studio → Commands, define reusable procedures for recurring investigation types.
What Commands do
Commands package multi-step investigations into one named operation, so users do not need to craft perfect prompts every time.
Commands can also reference Tasks that already exist in the workspace. Instead of encoding static details into the command itself, a command can point to a Task that gathers live data — for example, “fetch the latest release details” or “check deployment status for this service.” The Task runs against live infrastructure each time, so the command’s output reflects the current state rather than whatever was written when the command was created.
When to add Commands
Use Commands when the same diagnostic sequence is repeated by multiple engineers — “tribal” investigation steps known only by senior responders, variable quality between responders, or repeated follow-up prompts to gather missing checks.
Example Commands
- Investigate Namespace: pod status, warning events, and crash logs
- Troubleshoot Checkout Flow: checkout service and dependency checks
- Compare Environments: config differences between dev/test/prod
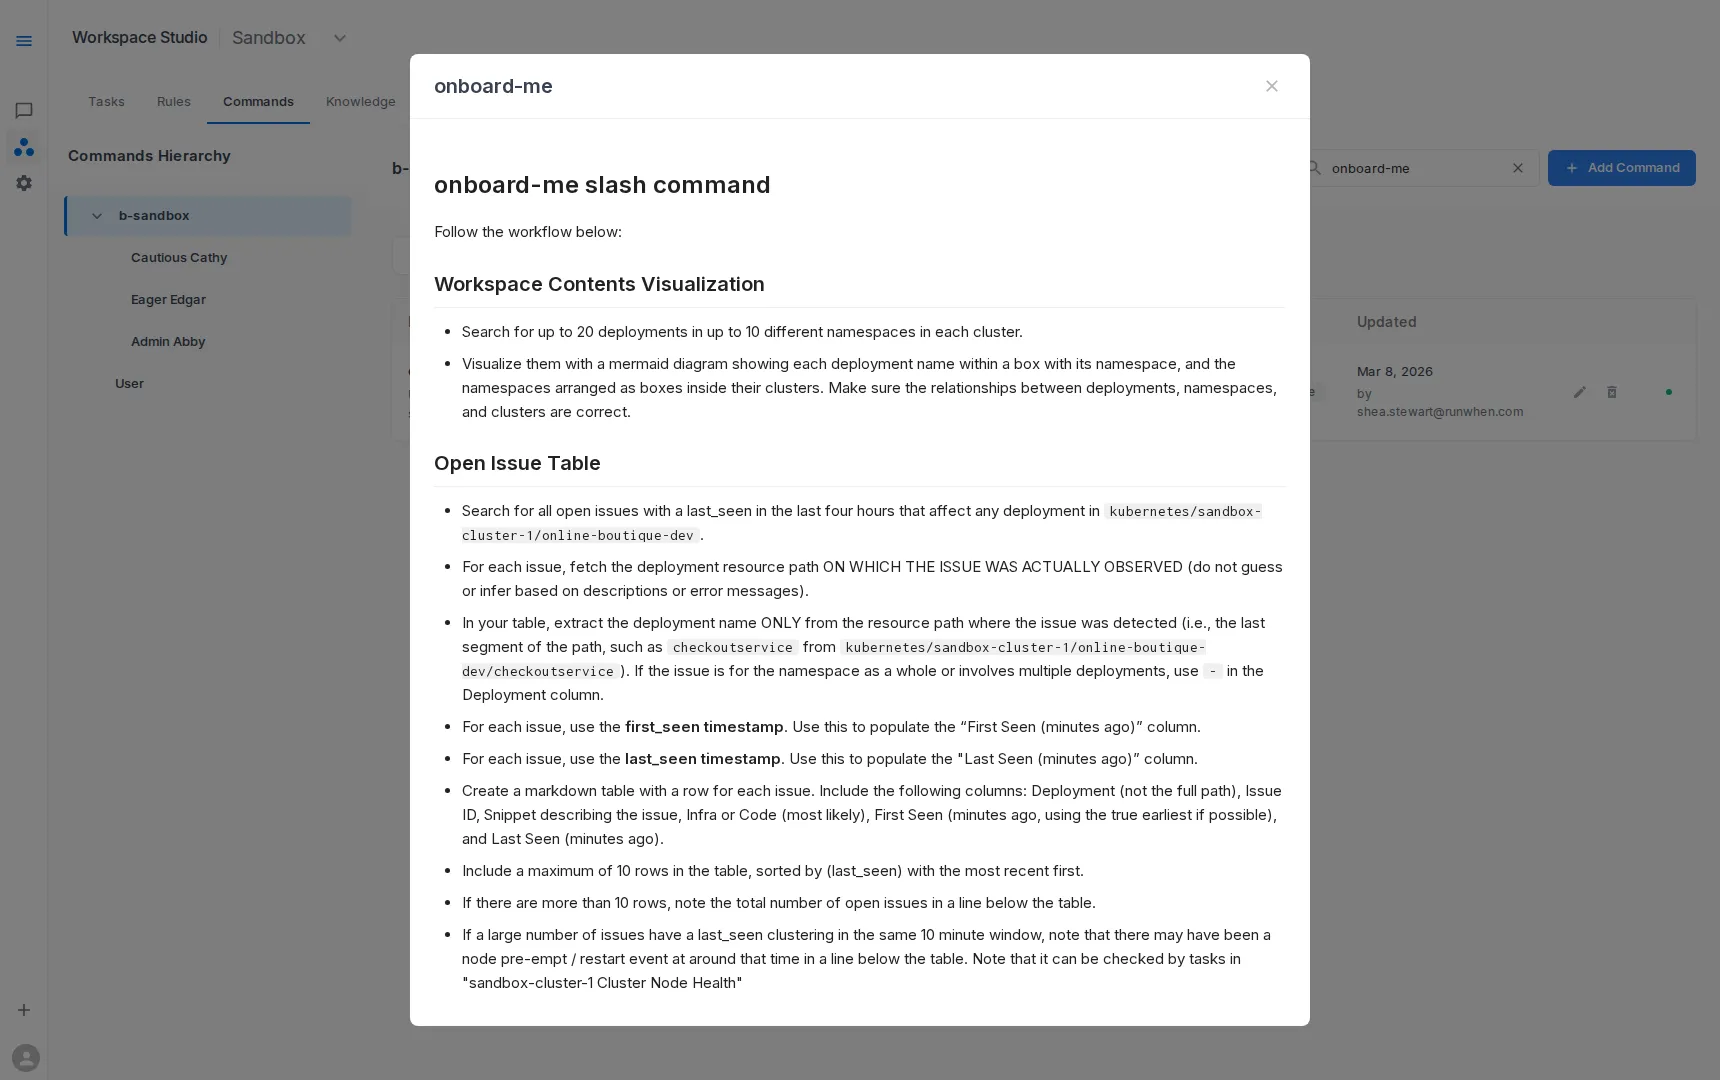
- Onboard Me: orient new users to workspace scope, key services, current risks, and recommended first prompts
- Pre-deploy Validation: reference Tasks that check resource quotas, pending pod disruptions, and recent error rates before a release
Command design tips
- Scope each command to a clear user goal.
- Prefer deterministic checks before open-ended analysis.
- Include output expectations (what “good” vs “bad” looks like).
- Reference existing Tasks for dynamic data rather than hardcoding details that go stale.
Step 4: Add Knowledge — complete Level 3
Effort: 1–2 people, a few hours over 1–2 weeks. Knowledge builds naturally as gaps surface during real investigations. Start with 3–5 entries and use
/rememberin chat to capture facts in the moment — this is not a documentation project.
In Workspace Studio → Knowledge, add concise notes that improve interpretation quality.
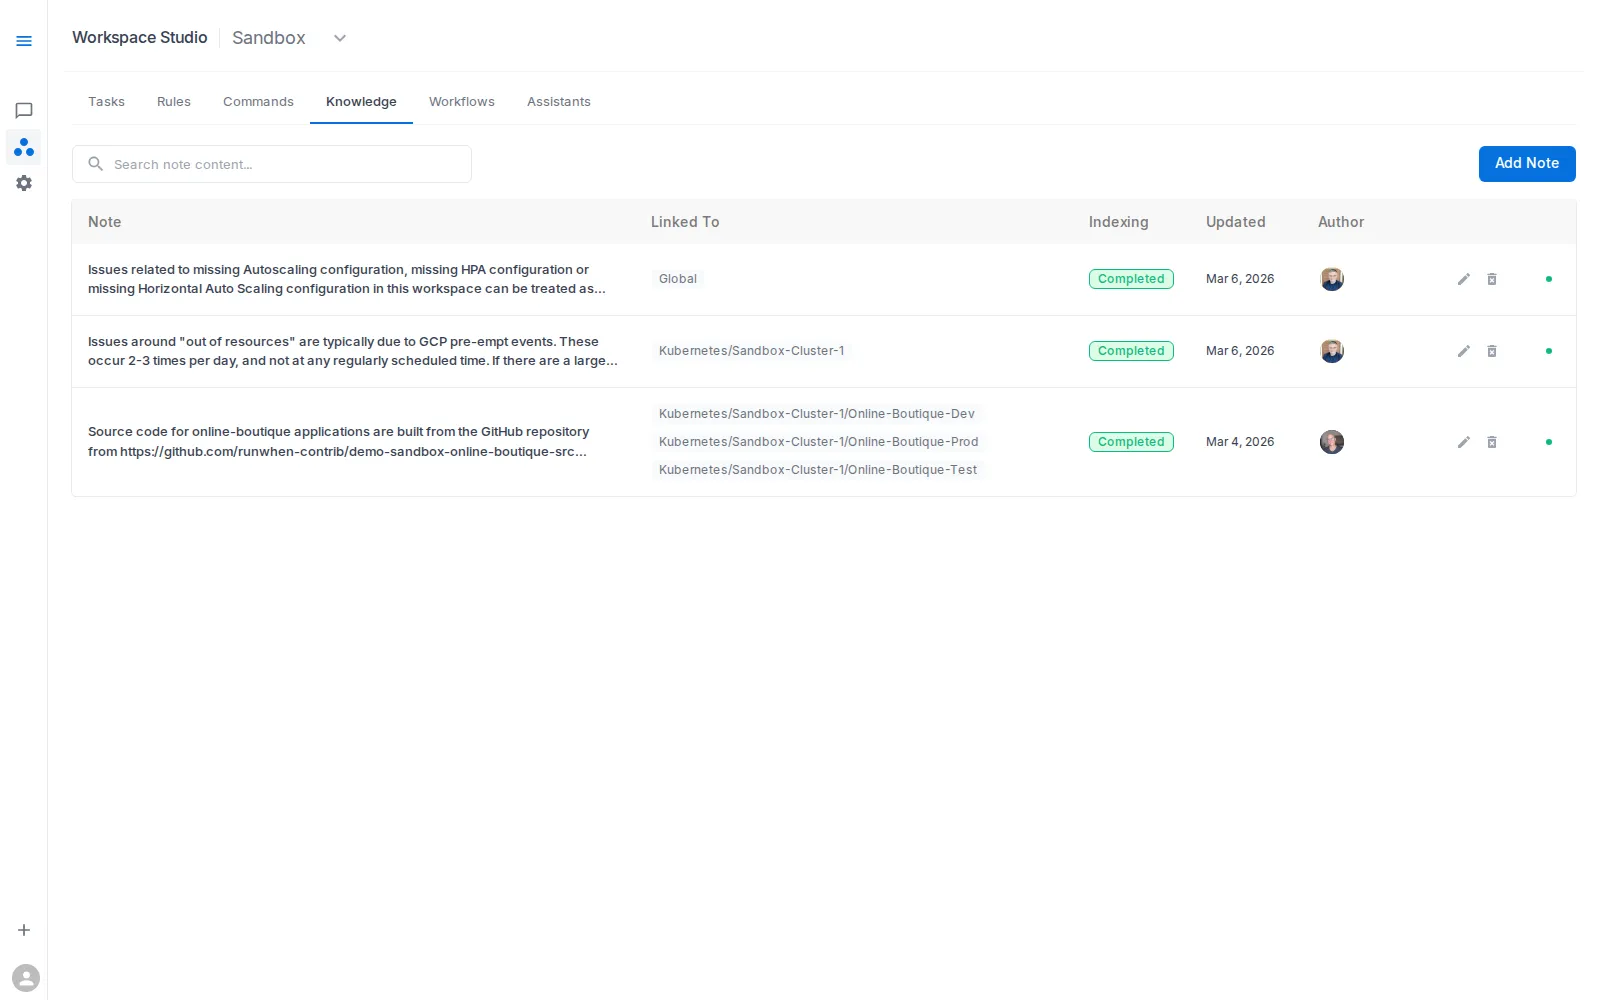
What Knowledge adds
Knowledge contributes durable local facts that are hard to infer from diagnostic output alone — the kind of context that lives in your team’s heads rather than in task results.
Knowledge entries do not need to be static text. An entry can point to a Task or an external system as the source of truth. Instead of manually writing the current release schedule, create an entry that says “check open change requests in ServiceNow for this service” or “run the release status Task for the current deployment window.” The assistant follows the pointer and gathers live context at investigation time, keeping the Knowledge current without manual updates.
Knowledge scoping
Knowledge can be scoped at two levels:
- Global — loaded into context for every investigation. Use for universal facts: team ownership boundaries, release processes, architecture assumptions.
- Resource-scoped — loaded only when a specific resource is identified during an investigation. Use for facts relevant to a particular service, namespace, or component. For example, a Knowledge entry scoped to the payments service might say “always check open change requests in ServiceNow for the payments service before diagnosing errors” — loaded when the assistant investigates payments, silent otherwise.
Resource scoping keeps the assistant’s context lean: global Knowledge provides the baseline, resource-specific Knowledge is added dynamically as the investigation narrows.
Examples
- Ownership boundaries between platform and app teams (global)
- Release process details — release cadence, freeze windows, rollback policy (global)
- Known maintenance windows (global or resource-scoped)
- Expected behavior for non-production environments (global)
- Architecture assumptions and service dependencies (resource-scoped)
- “Check open change requests in ServiceNow for this service” (resource-scoped, dynamic)
- “Run the deployment status Task before diagnosing this service” (resource-scoped, dynamic)
- Notes on recent major code changes and likely blast radius (resource-scoped)
Capturing Knowledge with /remember
You do not always need to visit Workspace Studio. In Workspace Chat, /remember captures a Knowledge entry on the spot — during the investigation where you discovered it. Type /remember followed by the fact you want the assistant to retain, and it is saved to the workspace immediately.
This is especially useful for context discovered in the moment: an undocumented dependency, an error pattern expected during a maintenance window, a service that behaves differently in staging. Instead of noting it somewhere and hoping to add it later, /remember captures it so every future investigation benefits.
Knowledge authoring tips
- Keep entries concise and operational.
- Prefer “how to interpret this signal” over large narrative docs.
- Use resource scoping to avoid loading irrelevant context into every investigation.
- Point to Tasks or external systems for information that changes frequently.
- Use
/rememberin Workspace Chat to capture Knowledge in the moment. - Add time bounds for temporary notes (for example: “valid through Friday release window”).
- Remove or archive short-term notes after the event passes.
Step 5: Re-run the same prompt and compare
Return to Workspace Chat and re-run the exact baseline prompt:
What's unhealthy in online-boutique-dev?
Compare before and after:
- Focus: less detour into expected noise
- Clarity: cleaner grouping of likely causes
- Actionability: clearer remediation path
This is how you measure the move from Level 1 toward operational confidence. Re-run your baseline prompt after each addition — Rules, Commands, Knowledge — to see the progression.
Reaching Level 4: Integration
Effort: Engineering investment, varies by integration. A CI/CD webhook that pushes release notes is a few hours; a full incident management integration is a larger project. Most teams reach Levels 2–3 first and pursue Level 4 when manual maintenance of context becomes the bottleneck.
Level 4 is where operational context stops being something your team manually maintains and starts flowing automatically from the systems you already use.
At this level, Rules, Commands, and Knowledge are connected to external systems:
- CI/CD pipelines push Knowledge updates when a release deploys, noting which services changed and what to watch.
- Incident management tools update Rules or Knowledge during active incidents, temporarily adjusting priorities.
- Change management systems feed release windows and freeze periods into the workspace, so assistants know when elevated change is expected.
- Runbook repositories sync operational procedures into Commands, keeping them current without manual updates.
Level 4 is built on the RunWhen API and the runwhen-platform-mcp server. The Managing Context as Code (GitOps) guide shows the reconcile-from-CI pattern that makes this practical. The foundation from Levels 2 and 3 — well-written Rules, well-scoped Commands, concise Knowledge — is what makes automated updates reliable. Without that discipline, automation just produces noise at a faster rate.
Putting it into practice
Once you have walked through the steps above, the question shifts from “how do I add context?” to “what patterns work best for my team?” The answer depends on whether you are building a long-lived baseline, onboarding new engineers, or navigating a period of rapid change.
An effective approach combines durable operational context with temporary overlays:
| Type | Time horizon | Typical examples | Where to encode |
|---|---|---|---|
| Durable context | Months/quarters | Team ownership map, release process, core runbook commands, architecture assumptions | Rules + Commands + Knowledge |
| Short-term overlays | Days/weeks | Active release window, recent major code change, temporary risk areas, known rollback plan | Knowledge updates + temporary Commands + scoped Rule adjustments |
Treat durable context as your operating baseline, then layer short-term context on top during periods of elevated change. Here are three common patterns teams use:
Scenario: Workspace-wide baseline (Levels 1→3)
Goal: build a stable operating baseline for all responders.
- Add Rules for known background noise and priority order.
- Add durable Knowledge (ownership, architecture, release policy).
- Add core Commands used in every incident path.
Outcome: consistent triage quality across the whole workspace.
Scenario: Onboarding at scale with an onboard-me command
Goal: get new engineers productive without tribal handoffs.
- Create an Onboard Me command that introduces key services, current health hotspots, and recommended first prompts.
- Back it with Knowledge entries for ownership and environment boundaries.
Outcome: faster onboarding and fewer ad hoc “where do I start?” questions.
Scenario: Release-week short-term overlay
Goal: improve accuracy during rapid change.
- Add temporary Knowledge notes for release window timing, major code changes, and rollback strategy.
- Add a temporary command (for example, release health validation flow).
- Optionally adjust Rules to increase focus on changed services.
- Remove or revise temporary entries after release stabilization.
Outcome: assistant responses stay aligned with the current change profile, not last month’s assumptions.
Measuring operational confidence
Building operational context is an investment — measuring the return matters. You are building operational confidence when you observe:
- Faster triage decisions
- Fewer unnecessary escalations
- More consistent investigations across users
- Higher trust in assistant recommendations
- New engineers acting on assistant output without senior review
Thumbs up / thumbs down feedback
RunWhen uses a thumbs up / thumbs down approach to measure trust directly. After every assistant response, each user can rate whether the investigation was helpful. This feedback is captured per session and gives you a concrete signal for how operational confidence is trending across the team.
To submit feedback, click the export link in the top-right corner of a Workspace Chat session. From there you can rate the response and optionally add a note about what was useful or what was missing.
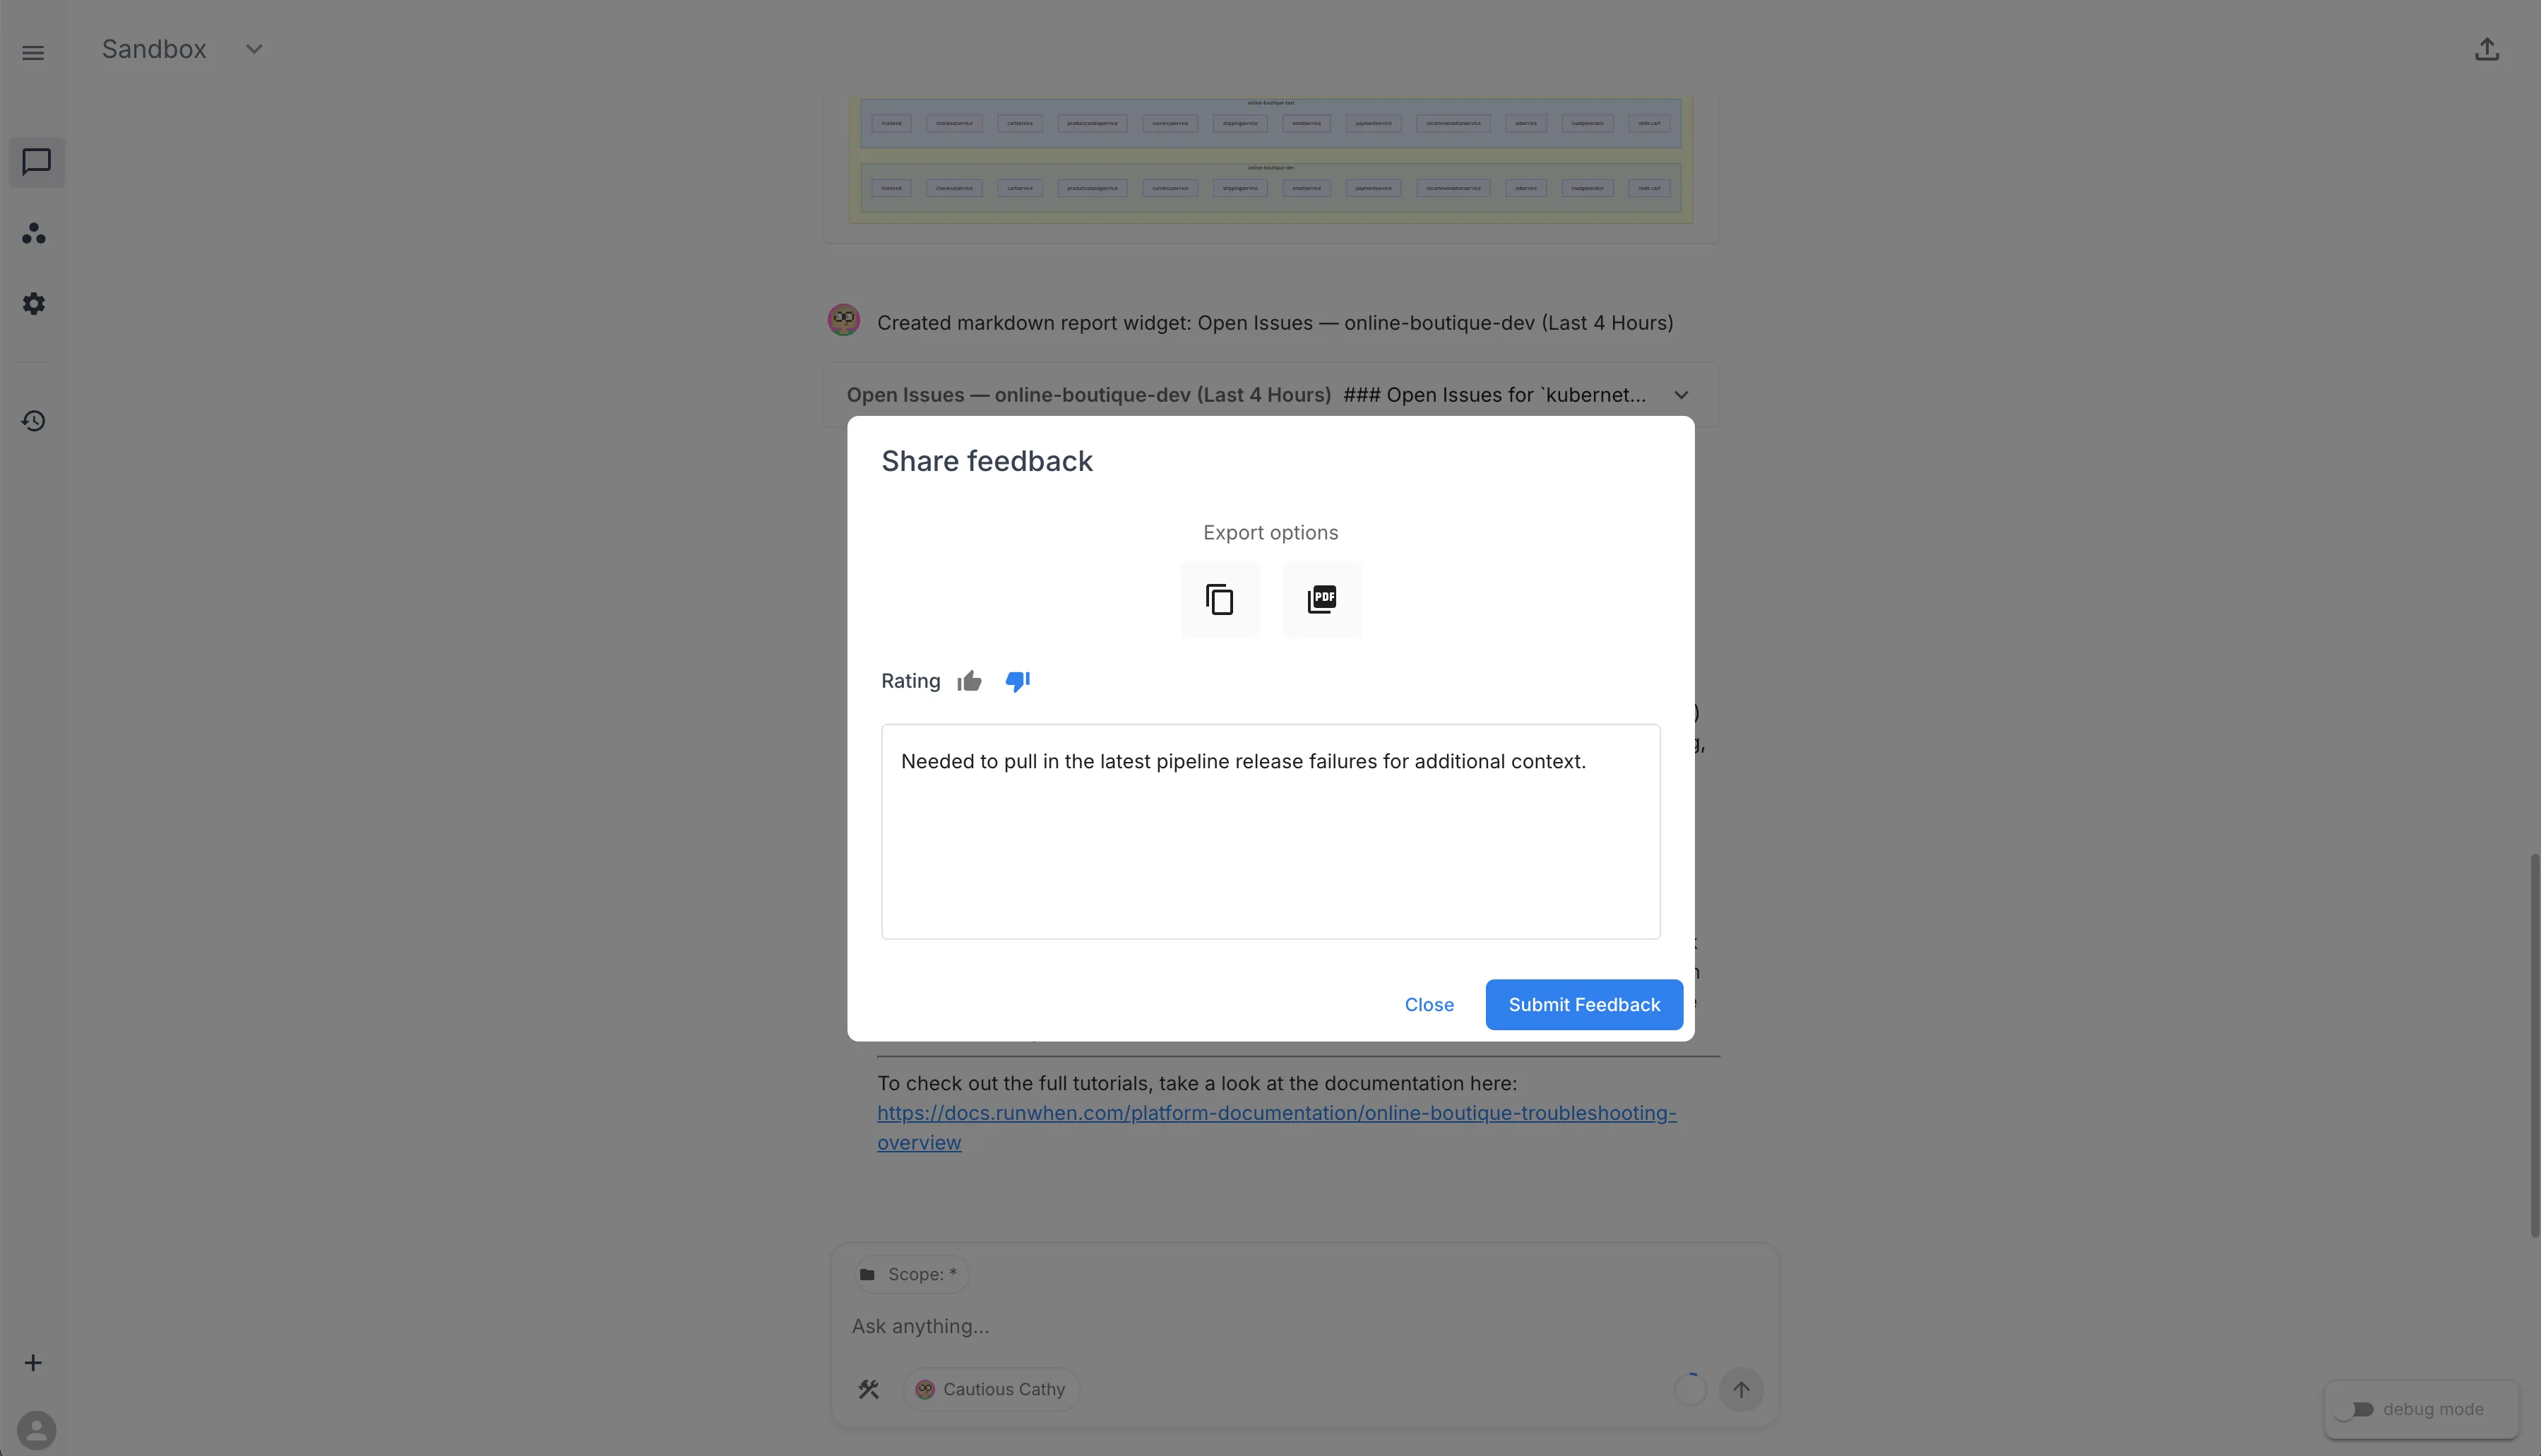
Track the ratio of positive to negative ratings — especially before and after adding Rules, Commands, or Knowledge — for a measurable view of how operational context is improving investigation quality over time.
Quick rollout checklist
- Capture a baseline prompt and note current quality
- Add 2–3 high-impact Rules
- Add 1 high-frequency Command and 1 onboarding command (
onboard-me) - Add 3–5 durable Knowledge entries (ownership, release process, architecture)
- Re-test with your baseline prompt and compare
- Review and update monthly
Related references: